Gigabyte M27U Advanced 4K 160Hz Monitor For Gaming
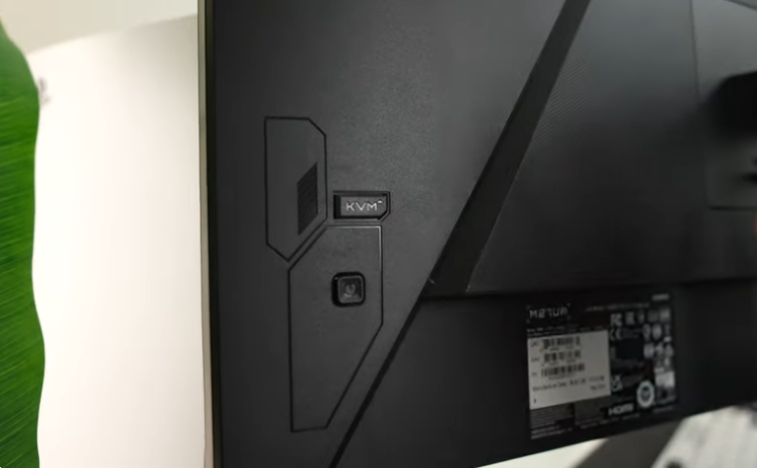
Table of Contents
Introduction:
Welcome to Tech Reviews. We’re going to be unboxing the Gigabyte M27U Advanced. All right, here is the bottom of the stand. It looks like pretty standard Gigabyte stuff. We’ve seen this for quite a while. A little bit of a difference there. Now, pretty much the same stand. We do like that these are flat because you can still set your phone on them on the desk. A little bit of gloss.
Here, metal on the bottom, high-quality thumb screw. Yeah, pretty decent stuff, pretty normal stuff though. All right, here we have the power cable. Here is the power cable. Looks like we have an internal power supply, which is super nice. And that’s right, Gigabyte always does this. They always give you all of the different power cables for all of the world’s different outlet standards, which is super interesting. So you have those if you ever travel with your monitor. Also in the box, we got an HDMI 2.1 cable. We have a DisplayPort cable, and then we’ve got some manual paperwork in there.
And we’ve got a USB Type B to USB Type A. This is important because on a lot of gigabyte monitors, and this one included, they give you a KBM switch, which is super cool. So this is imperative. With that, let’s open this up, get to the top part of the stand, and the monitor. Here is the top part of the stand. Pretty typical stuff that we’ve seen from them. It is sturdy. The quality, we think, is just like very middle of the line, and there’s nothing wrong with that.
Let’s put these together. You line them up by putting in those top pieces and then screwing in the thumb screw. You do not need a screwdriver for this because it is a high-quality thumb screw. And there’s the stand, decently heavy. And we’ll go over the adjustments once it’s on the desk. But here is the monitor itself. So line this up on the top. You can also see there’s the 100 millimetre VESA mount there, but you line this up on the top, press it in, and it’s snapped in. There we go. And let’s take this off.
Yeah, pretty normal-looking panel. But let’s get it on the desk. Check out the stand. We have height adjustability. Ooh, nice getting low. We have tilt. Everything is very smooth. We like it. There’s no swivel here, and there’s no rotation here. The only thing that we don’t like is how much wiggle there is for not having any sort of rotation. That’s just like the stand wobbling. However, let’s check out the ports. So first, we have the joystick here. This is also the power on button, but then this is the KVM switch, which is your keyboard, video, and mouse button. So you can plug all of your peripherals into the monitor itself.
And then when you switch between your inputs, you can switch all of your peripherals with that input. It’s really quite a game-changer, especially for people who have multiple devices. All right, so the first thing that we absolutely love is that the power cable is actually in the middle. So routing that down to this cable management hole is gonna be really easy and seamless.
That’s a good design. We also have a 3.5 millimeter connection and two HDMI connections. We believe these are both 2.1, a DisplayPort, which is 1.4, a USB type C, their USB type B upstream, and then three USB type A downstreams, 3.2s. At this price point, and for what this monitor is, which we think a lot of creatives may be using this for gaming and creative, as well as using this for the consoles, the Series X and PS5 and PS5 Pro. That’s a great number of ports, and we think it very much matches the user base of this monitor. With that, let’s get it on the desk, do an initial impression, a gaming test, and a ghosting test.
First Impressions:
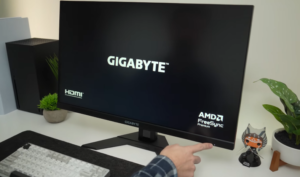
Now that on the desk, let’s get it turned on by clicking in that joystick. We have a little indicator light right there. All right, guys, immediately with this up, we can tell right away this is not doing its full refresh rate. So first, let’s go into the NVIDIA control panel. Obviously, it’s an IPS panel. So the colours look really good. The viewing angles are obviously great here. And really like having this white here, it just has colour accuracy, looks great out of the box in terms of its white balance initially. Let’s change this up to its full 160 hertz at 3840 by 2160 or 4K. Let’s see if this can output 10 bits of colour and it can output 12 bits of colour for, you know, Dolby Vision HDR. We don’t think this has Dolby Vision.
But you guys get the idea. That’s really cool. We think again for this price point, if this does the basic things like ghosting brightness, which we’re assuming both of those things are going to do very well with, but if it does that well, this is an excellent monitor for console players that want to get full 4K 120 creatives and PC gamers that are doing all of those things together. That’s the best-case use scenario here.
All right, let’s go right into the menu system here. Gigawatt has an okay menu system. We don’t love it, but it is easy to get to. We just don’t like how pixelated it is for being a 4K resolution. So we have a few different little settings, aim stabiliser, sync, black equaliser, 2.0, super resolution, which is just, we really don’t like that they do that. That’s literally just a clunky, clarity boost, a sharpness boost. We really wish they would just keep the names like normal, even though it’s not as fun, we guess. For someone who’s not into Mars, it’s gonna be very hard for them to go. What is super resolution? It doesn’t make any sense. And that’s the part that we don’t like about it. We have our aspect ratios and again, display.
Mode rather than aspect ratios doesn’t make any sense. These are our overdrive settings. So our response time settings are in here. We then have FreeSync Premium. Let’s go into picture modes. If we do that, more power consumption, obviously, will occur. We’re going to take this out of eco, custom, and sRGB. Those are the three. That’s super interesting. In the display, there’s nothing else. That’s super interesting. We don’t know if that’s been the same on previous monitors, but at 85% brightness here, we can see 85% brightness. It looks great. Let’s turn the brightness off.
All the way up and that is very decently bright we mean that looks great that’s one of the biggest benefits of ips panels let’s go into something white and you see here on something white it just looks great colours look good the white balance looks pretty dang bang on we’re guessing it’s pretty dang close but it really looks excellent colours look nice and vibrant it’s nice to get back and just use an ips panel it feels like it’s been so long we’ve been using so many oleds recently and we love oleds.
But they just have more problems than IPS panels. While they’re not as crazy with their black levels, for the price, they typically have the perfect brightness, colours look great, and they’re just so refined at this point. You’re really not gonna get an IPS panel that’s messed up, typically. All right, so let’s continue going through this, going into the coloration.
Custom mode, which is what we would recommend right away. We have our six-axis colour, colour vibrancy here, and sharpness. We have our colour temperature, which is normal. Let’s see natural. Natural is definitely too cool, but then you can actually do it yourself, which is great. Then we have low blue light. That’s actually a very cool mode that adds it on top of your overall picture mode, which we think is actually a very cool way to do it. Then let’s continue going through the display. These are inputs. Oh, and this is also very cool. Apply picture mode to all the inputs.
That is super cool. So you can change your pictures as if you have an Xbox, and on the Xbox that’s plugged into HDMI one, let’s say HDMI one, for instance, you want it to be more saturated because you’re just going to be gaming. But then, on your PC or your Mac, if you want it to be more colour accurate, you can change the picture modes that way. That’s really cool. Like that’s actually really great. And that’s what we mean, this is so good for creatives here. You also have your picture in picture, picture by picture. It looks like you have a lot of adjustments here. The menu system is nice and fast. You see, you have a lot of different settings, which is great. We’re going to turn that off.
Now, going into the system, we have some audio controls. We have the OSD. You can move it around, which is really cool. We have auto input switching and type C compatibility. And then lastly, we just have languages and then a reset button, which is nice. Overall, simple. We wish they would change some of those names, but it looks great visually. This looks awesome. Nice brightness. You’re obviously not getting the contrast ratio of an OLED.
Gaming First Impressions:
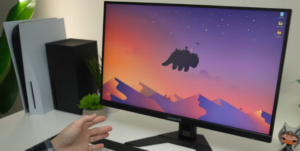
But let’s jump in game and see how this thing does. Now, while we are going to use headphones, this monitor actually does have speakers, which is really cool. And initially, we don’t want to copyright it with Call of Duty’s uh theme song, but Sounds okay. Sounds like you know, typical monitor speakers, which is cool. Let’s jump in. All right, guys, jumping right into the game right away. The resolution looks great. Brightness is excellent here. There’s definitely a little bit of dirty screen effect. Do we notice it in-game? Not really, but there is definitely a little bit of dirty screen effect here. But the resolution, if you guys haven’t used a 4k monitor, is an absolute game-changer.
It really is. It’s so hard to go back with a resolution refresh rate over everything for sure. But if you can have a 49 or something to run 4K at a higher refresh rate, it’s an absolute game-changer because resolution just looks so good in games. So all this is only 160 Hertz. You’re obviously not going to get the fluidity of something like a 240 or 360-Hertz panel realistically in-game. You’re probably not going to be able to push frames.
Enough that you know, you’re gonna actually be able to hit 240 frames. So really, at 4k 160 for most people, at least for the near future, for most people That’s probably the max, especially at this price point. Well, that’s not cheap. You probably don’t have a super high-end graphics card, and that’s what it’ll take to run those frames, so while you may be enticed to buy or feel like you should buy a higher refresh rate, in a lot of cases, it doesn’t really make sense. But the brightness here is awesome. We mean, it’s so vibrant. It’s obvious you don’t have the blacks like in these areas, and we’ll go inside, and we’ll kind of show you, but ghosting looks great here in these areas. You just don’t get the depth, the darkness of colours.
But it is still an incredibly enjoyable experience, and in a lot of cases, we actually prefer IPS panels because if you only want to buy one monitor and keep it for ten years You can do that on something like this IPS panel. Whereas with an OLED, you probably won’t be able to do that. It’s kind of like a Mercedes-Benz, most BMWs, at least most BMWs from seven years ago, eight years ago. You’re just gonna be upgrading all the time, every couple of years. This monitor is reliable enough to last a very, very long time. It’s great to game on. We mean, the colours look great. The only thing we don’t like is the matte finish here. There is a little bit of that dirty screen effect. It’s not a super intense, dirty screen effect with how bright this panel is, how vibrant this panel is.
It looks great. It looks really, really quite good. Not an OLED, but you do get a higher brightness here. And one thing before we actually dip out of this game, we’re going to try HDR. Okay, well, just visually, it looks like it increases the brightness, the overall screen brightness. Okay, so now here in HDR, the colours definitely are undersaturated. There’s a little bit of weirdness going on with the colours. They’re just under saturated, but the brightness of the sun, like that, is extremely bright.
That highlights, you know, they’re doing a good job there. It also does seem to change the gamma, but everything just has almost a kind of grayscale effect over it. So the tuning here is not perfect. It’s not atrocious, but it just is like, it just pulls the saturation down across the board, which is why it kind of looks like grayscale.
However, this looks like the Windows HDR calibration tool, which is free again, guys. If you have Windows 11, definitely get that. If you have a monitor that’s capable of hdr definitely check that out. Just looking at this, we think that would fix the hdr and it seems like it might be worth it to increase that overall screen brightness there with that. Let’s see, really quickly, if there are any settings that you can adjust in the picture so we have HDR. Oh, we also have hdr game. Let’s go in-game. See how that looks so hdr there.
That definitely increases saturation. HDR movie. We think the game honestly looks the best. Then you have some colour enhancements, which look like they just increase the saturation. That’s excellent. That is excellent. Okay, that looks a lot better here. Is it accurate?
We’re not sure it looks a little over-saturated, but we didn’t really play around with it. It might be better to go into that other setting and see what we can do, but it looks so much better. So that’s really cool. That’s actually excellent that they have all of those settings. Not extremely common to have that, really, good with that.
Ghosting Test :
Let’s do a ghosting test. We expect to be very good. It’s exactly as we expected. It is absolutely crystal clear. Now, this is one of those panels when we talk about OLEDs and good IPS panels having essentially the same amount of ghosting.
While on a test result, it’s gonna look like an IPS panel like this is so much slower than an OLED. And in practice, because of how our eyes see all of these panel technologies, that includes OLEDs, that includes these IPS panels, visually, it’s not getting better than this. You’re just not getting better than this, whether it’s an OLED or anything else. We’re gonna take the camera and show you what we’re seeing. And as you can see, that is absolutely crystal clear.
Now, the only thing that we’re seeing here is that there is a tiny bit of pixel overshoot or inverse ghosting. Let’s go into this setting here. We think that’s actually in-game overdrive. Let’s go into off, and that takes away that overshoot completely, and it does a tiny little bit of ghosting, but still, it’s extremely minimal. So again, that one gives a little teeny bit of overshoot. You probably wouldn’t even notice it. We didn’t notice it in-game, to be honest with you. Now, picture quality removes that overshoot, and it has even less ghosting than the offsetting. So right away, picture quality is the best so far. Balance brings back a little bit of overshoot, and speed definitely gives a lot of overshoot. So the best setting we’re going to say right now is picture quality. Set it in that one.
Leave it in that absolutely excellent that is crystal clear it’s as good as you’re really ever going to get until they can figure out an ultra low motion blur that doesn’t make your monitor look like it is 100 nits overall we’re actually really impressed more so than we were expecting because it’s just a 4k ips 160 hertz but we really like the settings that you can adjust so especially in HDR. That’s pretty rare.
Stay healthy, stay safe. Take care. Bye.